Tuesday, May 2, 2023

Making a Wax Mold over a plastilene original


Height:  24 "
 
Step One:
take photos of the plastilene original.
They may be needed to reconstruct parts that were damaged in casting. 
 
Note:
 The goal of a  multi-piece rubber or silicone mold is to make an exact reproduction.

At minimum, the goal of a wax mold is to make an armature upon which additional casting material can be added. 

At best, a wax mold can preserve some areas of detail in the face and torso. If the arms are extended, do not expect the fingers to be saved.


This is also a good time to start thinking about where you will cut windows through the mold that will allow removal of the plastilene within.
 
Extraction windows should be no larger than necessary -
just in case the section removed is too damaged to be cast and re-attached.


Step two:
 
apply three to four layers of gloss lacquer to the surface. 
Wax and plastilene stick to each other, so applying layers of separation is critical.

Even the best wax mold damages the surface,
so do not be afraid of obliterating it with  thick layers.

When the lacquer is dry, spray on a few layers of Pol-Ease 2300 that leaves a light, oily film.


here is the wax that I use.
It can be reused many times,
but each time some is lost.
The above order lasted me  about 12 pieces.


I use this to melt the wax - turned to 250 it melts a 10 quart pot in 3 hours.

(This wax melts at 180 )

It melts quicker at 400 degrees, but it creates quite a stench and probably reduces the volume of wax.


This is needed to deal with the fumes.


I use two pots - so that one of them will always have hot wax to refill or reheat  the other.


the wax is reinforced with strips of burlap.  If not cut too small during mold cutting, they can be re-used. 


Other tools used;


1-inch brush to apply liquid wax

Tongs and rubber gloves to handle pieces of burlap saturated with hot wax

Bolt cutter to help remove inner wire armature from the mold.


*********************************  applying the wax**************************

When the wax is too hot, it runs like water right off the surface.

When it is too cold, it will not catch details you may want.

I let the melted wax cool until it begins to form a crust on the top of the cooker.


Stir the wax after  the pot is unplugged and begins to cool.

The wax works best when it is thick like jelly or jam.


Usually - I build up a  quarter inch of wax before applying strips of wax soaked burlap

except:  I apply wax soaked burlap directly to the plastilene surface on  those areas that will be removed as extraction windows.  Otherwise - the surface wax is likely to become  delaminated from the burlap strips.

It seems best to  apply burlap to a waxed area immediately - again, to prevent later delamination.

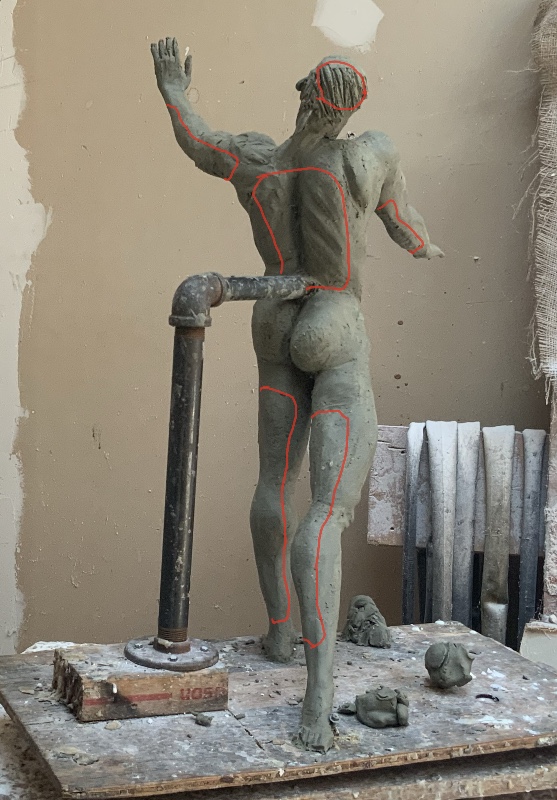
Extra care must be taken for the face - and the mold as a whole may need to be reinforced with heavy layers of burlap  -- or even pipes of sticks of wood as necessary


The NUMBER ONE DISASTER  is when the emptied mold breaks or bends before it has been filled with casting material.

This piece required no wood or pipes for reinforcement -but I did build up the areas between the arms and torso - as well as near the ankles.

It is also important to build up the front of the torso on a standing piece since a large window will be cut in the back, leaving the mold weak in the middle of the piece.


*********

The hot wax makes the plastilene soft - and easy to remove from the mold.  So it is best to begin removal as soon as possible.  If you start too soon, the wax mold itself will still be soft and pliable.  This is a bad thing!   If you start too late, the plastilene will need to be dug out laboriously.  


I begin heating the wax in the early morning, while still doing last minute changes to the plastilene.

About 2pm I begin to apply the separators - and half an hour later I’m applying the wax.

By 3pm, that job is done and I take about an hour lunch break.

By 4pm I am cutting the extraction windows and removing plastilene.  I use a circular cutting disc on a rotary tool to begin the cut as clean as possible - then finish off with a serrated knife.


I
The red lines indicated the extraction windows cut out for this piece.


BTW — here is the biaxial kind of fiberglass that I use as reinforcement.

Amazingly enough — when you soak it with Forton,
it will lie flat and not fall off a vertical surface - and sometimes will even cling to a horizontal surface that faces downward.


After the mold has been filled (in this case with Forton MG reinforced with fibre glass), the wax can be removed after softening it in a tub of hot water.  ( I fill a plastic garbage can with hot water from the tap)


You will notice in the above example that the left hand was destroyed ( and actually, the right hand needed to be rebuilt  with expoxy clay as well) 


You will also notice the seams running down the arms and legs where the extraction windows were cut.

The back of the torso has not yet been attached to the figure because, in this case, I was not sure exactly how it should fit.  It was cast separately and then attached later.


Here is the cast after about 10 hours
of cutting, grinding, patching, sanding etc.

Occasionally I sand an area to smoothness - but usually that does not seem appropriate.


I would not call it finished,
but at least it’s as far along as the plastilene got before casting.
Will continue to work on it, periodically,  over the next few months.

By the way , the piece was sculpted based on a set of eight five-minute drawings like the above.

But it was also based on the 35 hours or so spent with the same model in different poses -
like the one below:


Here’s a mold for a different pose.
Note how wax fills the space inside the arms and is heavily built up at the ankles

The elbows will be cut off to remove plastilene  in the arms.


Saturday, March 1, 2014

Project: Rachel


One model,
two poses,
four statues,
two done from these drawings,
two done from life.


************************************


**************


 The first day of the life study.
Our Russian friends call it "finished"

Saturday, March 6, 2010

The Studio - March 2010


left to right:
*portrait of Ralph Murphy, music lover, enterpreneur, and gallerist (just begun)
*votive figure (on the floor)
*Birth of Venus (on the wall)
*portrait of Bruce Pempek (local Wallachian genius)
*portrait of Robin Mumford (art dealer)

Tuesday, March 3, 2009

Thursday, March 6, 2008

march 2008

Guess I've changed
just about everything,
not especially for the better
different, yes
better, no


Saturday, January 12, 2008

January 2008


Whoa -- it's certainly gotten
a lot more florid in the last month,
and the characters feel less staid.

Now, there's an awkwardness about Eve
that bothers me,
and the piece seems uneven
left to right


These figures have pulped out some more,
and feel a little more desperate.
But has the piece improved ?


This piece feels scarier,
and more magical,
and I'm happy about that.
Can I ratchet it up any more ?
I'm not sure.


I'm afraid
I do kind of like the earlier version
better.

This figure is getting too awkward.

I'm trying to make her feel
more as a prisoner of her destiny

Friday, November 30, 2007

December 2007

Adam and Eve

I've feeling good about the right side
of this design

But Adam needs something...
to be both more vulnerable
and more vigorous/youthful/manly
He needs to be erupting a little more from
his background


Birth of Venus


Maybe she needs to be little younger,
a little more like a spring
uncoiling.
(and the left side is not happy with the right)

I want a greater sense
of the difficulty of her emergence


Michael and Satan

I'm liking Satan's fall
more than Michael's triumph.

It's not quite majestic enough,
he's supposed to have
the power of the cosmos
after all.


"Mars and Venus
Heaving in the net
that limping Vulcan
and his Cyclops set"


I like Mars the best at this point,
maybe Venus needs to do
some more writhing ?
Overall -- the piece needs to feel
less cute and more monumental.

maybe I should throw
a net across Venus ?